

How To Clean The Rollers On Epson Wf 7110
Z7_3054ICK0KGTE30AQO5O3KA30N0
hp-concentra-wrapper-portlet
![]() Deportment
Deportment
Blinking Lights on the HP Officejet 7110 Wide Format ePrinter Series
This certificate applies to the HP Officejet 7110 Wide Format ePrinter Series
The blinking lights on the front of the printer indicate the printer status. These lights tin be on, off, or blinking (flashing), depending on the status of the printer. Blinking lights can indicate fault conditions. They might as well bespeak that the printer is initializing or processing a impress job.
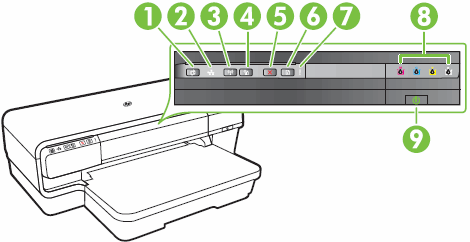
Post-obit are the different lights and buttons on the printer control panel.
Effigy : Control panel lights and buttons ePrint push button and low-cal Ethernet light Wireless push button and low-cal Network Information button Cancel button Resume push and light Alert light Ink cartridge lights Ability button and lite
The post-obit sections draw the most common issues related to the light patterns on your printer. Notice the event related to the blinking lights design you are experiencing, and so follow the steps to resolve the issue.
Issue: All lights are off
The following light pattern displays on the printer control console:
-
All lights: Off
Figure : All lights are off

Issue: The Power low-cal is on
In this normal condition, the following light blueprint displays on the printer command panel:
-
Power lite: On
-
Resume light: Off
-
Wireless light: On or off, depending on the connection condition
-
Alert light: Off
-
HP ePrint light: On or off, depending on the connexion status
Figure : The Power lite is on

Issue: The Power light blinks
In this normal condition, the following lite pattern displays on the printer control panel:
-
Power light: Blinks
-
Resume light: Off
-
Wireless calorie-free: On or off, depending on the connection status
-
Alert light: Off
-
HP ePrint calorie-free: Off
Figure : The Power lite blinks

Outcome: The Ability light is on and the Alert light and Resume lite blink
The post-obit light pattern displays on the printer command console:
-
Power low-cal: On
-
Resume light: Blinks
-
Wireless light: On or off, depending on the connectedness status
-
Alarm light: Blinks
-
HP ePrint light: On or off, depending on the connection status
-
Cartridge lights: Off
Figure : The Ability low-cal is on and the Resume calorie-free blinks

Solutions
Important: You lot must follow these solutions in the order presented to resolve the result.
Solution i: Turn the printer off so on again
Turning off the printer and then turning it on again tin can recalibrate the cartridges.
Step 1: Turn the printer off so on over again
Follow these steps to turn the printer off and then on again.
-
Press the Power push button to turn off the printer. If the printer does non plough off, continue to the adjacent solution.
-
Expect 60 seconds.
-
Press the Ability button to turn on the printer.
note:
The printer might go through a warm-up period, which might concluding several minutes. Wait until the warm-up flow completes before you continue.
Footstep two: Print a exam folio
Printing a examination page verifies if the hardware functions correctly.
-
Load patently white paper in the newspaper tray.
-
On the printer control panel, printing and hold the Abolish button (
 ) for three seconds, and and so release. The test page prints.
Figure : Example of a test page

-
If these steps resolved the effect, and the examination page prints, there is no need to continue troubleshooting.
-
If the issue persists, go along with the next solution.
-
If the examination page does non print, proceed with the next solution.
Solution two: Articulate whatever jammed newspaper
Follow these steps to clear whatsoever jammed paper from the rear of the printer, and then clear any jammed paper from the forepart.
Step 1: Remove whatsoever loose newspaper
Remove whatsoever loose sheets of paper from the input tray and the output tray.
caution:Exercise not remove jammed paper at this stage. Trying to clear jammed paper from the front of the production tin can damage theprint mechanism.
Step 2: Clear any jammed paper from the rear of the printer
Follow these steps to remove any jammed paper from the rear of the printer.
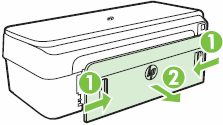
Rear admission door
-
Remove the rear access door. Push in the handles on either side of the rear access door, and then pull out the door.
-
Push in the rear access door handles
-
Pull out the door
Figure : Remove the rear access door
-
-
Gently pull the paper out of the rollers inside the printer.
-
Clear any jammed paper from the rear admission door.
-
Insert the rear access door. Push in the handles on either side of the rear access door, and then push the door frontwards until it snaps into place.
Duplexer
-
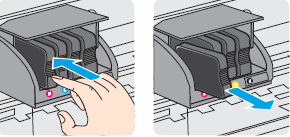
Remove the duplexer. Push button in the buttons on either side of the duplexer, and and then pull out the duplexer.
-
Push in the duplexer door buttons
-
Pull out the duplexer
Figure : Remove the duplexer

-
-
Gently pull the paper out of the rollers inside the printer.
-
Clear any jammed paper from the duplexer rollers.
-
Insert the duplexer. Push the duplexer frontward until it snaps into place.
Stride 3: Clear any jammed paper from the front end of the printer
If at that place were no jams in the rear of the printer and the lights nevertheless blink, follow these steps to check for paper jams in the forepart of the printer.
-
Disconnect the power cord from the rear of the printer.
alarm:
You must disconnect the power cord before reaching within the HP printer to avert hazard of injuries or electric shock.
-
Disconnect the USB cable from the rear of the printer if you take a USB connectedness to the figurer.
-
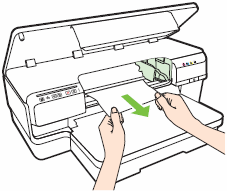
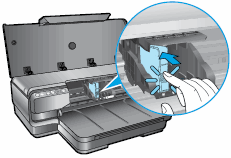
On the forepart of the printer, open the cartridge access door.
Figure : Open the cartridge access door

-
Gently remove whatsoever jammed newspaper and bits of torn paper from the cartridge admission expanse. To avoid tearing any whole sheets of paper, pull the paper with both hands.
Figure : Remove any jammed newspaper from the cartridge access surface area
-
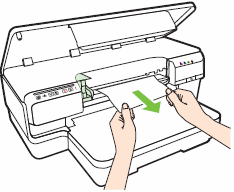
Movement the carriage to the left.
Effigy : Move the carriage to the left

-
Remove any jammed paper from the right side of the carriage. Pull the newspaper towards you and through the top of the printer.
Figure : Remove any jammed newspaper from the right side of the carriage
-
Close the cartridge access door.
Figure : Close the cartridge access door

-
Reconnect the ability cord to the rear of the printer.
-
Press the Power button to turn on the printer.
Footstep 4: Make sure that the carriage can movement freely
Follow these steps to make sure that the carriage moves freely across the width of the printer.
-
Printing the Ability button to plow on the printer if it is not on already.
-
Open the cartridge access door.
note:
The carriage might try to move into the access area. If it does, allow it to move to that position.
Figure : Open the cartridge access door
-
With the printer turned on, disconnect the power string from the rear of the printer.
-
Unplug the power cord from the ability source or electrical outlet.
warning:
To avoid the risk of electrical shock, y'all must unplug the power cord before moving the railroad vehicle by hand and resetting the paper feed machinery.
-
Locate the printhead access cover at the top right side of the carriage admission area, and then cheque to meet if it has two screws in it.
Figure : Example of a printhead access cover with two screws

-
Choose the correct option, and and then follow the steps.
-
The printhead cover has two screws in it.
-
Check for and remove whatever loose paper or objects that might be restricting the railroad vehicle.
-
Use a flashlight to check for torn pieces of paper that might remain inside the printer. If any torn pieces of paper remain inside the printer, more jams are likely to occur.
Use a flashlight
Paper jammed in carriage path

-
Reach into the cartridge access area, and then manually move the carriage.
-
If the railroad vehicle is stuck on the correct side of the printer, move the carriage to the left side of the printer.
-
If the carriage is stuck on the left side of the printer, move the carriage to the right side of the printer.
-
If the carriage is stuck in the middle of the printer, motion the wagon to the correct side of the printer.
-
-
Remove any loose paper or objects constitute.
-
Brand sure that the carriage can move freely across the width of the printer by gently pushing the carriage to the left, and so to the right.
-
Close the cartridge access door.
Figure : Close the cartridge admission door
-
Reconnect the ability cord to the rear of the printer.
-
Plug the power cord back into the power source or electrical outlet.
-
Printing the Power button to turn on the printer.
-
-
The printhead comprehend does non take two screws in it.
-
Open the printhead admission cover past pulling the tab toward you lot, and and so lift up.
Effigy : Open the printhead access cover

-
Check for and remove whatsoever torn pieces of paper in the printhead access area.
Figure : Remove torn pieces of paper from the printhead admission area
-
Shut the printhead admission cover. Make sure that the hooks on the cover snap deeply into identify.
Figure : Close the printhead access embrace

-
Close the cartridge access door.
Figure : Close the cartridge admission door
-
Reconnect the ability cord to the rear of the printer.
-
Plug the power cord back into the power source or electric outlet.
-
Press the Power button to turn on the printer.
-
-
Footstep 5: Impress a exam page
Printing a test page verifies if the hardware functions correctly.
How to impress a test folio
-
Load patently white paper in the paper tray.
-
On the printer control panel, press and concord the Cancel button (
) for iii seconds, and then release. The test page prints.
-
If these steps resolved the effect, and the test page prints, there is no need to continue troubleshooting.
-
If the issue persists, continue with the next solution.
-
If the test page does not print, continue with the side by side solution.
Solution 3: Make clean the paper rollers
Follow these steps to make clean the paper rollers and impress a examination folio.
Step ane: Clean the newspaper rollers
Follow these steps to make clean the newspaper rollers.
Rear access door
-
Get together the post-obit materials:
-
A clean, lint-free cloth, or whatever cloth that will not come autonomously or get out fibers
-
Distilled, filtered, or bottled water (tap water might harm the printer)
-
Clean, lint-free cotton wool swabs
-
-
Press the Power push to plow off the printer, if it is not already off.
-
Disconnect the power cord from the rear of the printer.
warning:
You must disconnect the power string before reaching inside the printer to avoid risk of injuries or electric shock.
-
Remove the rear access door. Push in the handles on either side of the rear access door, and so pull out the door.
-
Push button in the rear access door handles
-
Pull out the door
Effigy : Remove the rear access door
-
-
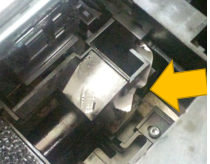
Lightly dampen a clean, lint-free material with bottled or distilled water, and then squeeze any excess liquid from the cloth.
-
Printing the fabric against the rollers, and so rotate them up with your fingers. Use a moderate corporeality of pressure level to remove any grit or clay buildup.
Figure : Clean the rollers

-
Let the rollers to dry completely (approximately 10 minutes).
-
Insert the rear access door. Push in the handles on either side of the rear access door, and then push the door forrad until it snaps into place.
Duplexer
-
Assemble the following materials:
-
A clean, lint-free material, or any fabric that will not come apart or exit fibers
-
Distilled, filtered, or bottled water (tap h2o might damage the printer)
-
Clean, lint-costless cotton swabs
-
-
Press the Power button to turn off the printer, if information technology is non already off.
-
Disconnect the ability cord from the rear of the printer.
alert:
You must disconnect the power string before reaching inside the printer to avoid risk of injuries or electrical shock.
-
Remove the duplexer. Push button in the buttons on either side of the duplexer, and and then pull out the duplexer.
-
Push in the duplexer door buttons
-
Pull out the duplexer
Effigy : Remove the duplexer
-
-
Lightly dampen a make clean, lint-free cloth with bottled or distilled water, and so squeeze whatever excess liquid from the fabric.
-
Press the cloth against the rollers, and so rotate them upward with your fingers. Apply a moderate amount of pressure to remove whatsoever grit or dirt buildup.
Figure : Clean the rollers
-
Permit the rollers to dry completely (approximately 10 minutes).
-
Insert the duplexer. Button the duplexer frontwards until it snaps into identify.
Step 2: Impress a test page
Printing a test page verifies if the hardware functions correctly.
How to print a test folio
-
Load plainly white paper in the newspaper tray.
-
On the printer control panel, press and concur the Cancel button (
) for 3 seconds, then release. The examination folio prints.
-
If these steps resolved the issue, and the exam page prints, at that place is no need to continue troubleshooting.
-
If the issue persists, continue with the next solution.
-
If the test page does not print, go on with the next solution.
Solution four: Reset the printer
Sometimes a paper jam error persists even though there is no jammed paper (false newspaper jam). Resetting the printer clears a simulated paper jam error.
Step ane: Reset the printer
Follow these steps to reset the printer.
-
With the printer turned on, disconnect the power string from the rear of the printer.
-
Unplug the power cord from the wall outlet.
-
Look at least 15 seconds.
-
Plug the ability cord back into the wall outlet.
-
Reconnect the power cord to the printer.
-
Turn the printer on.
Step 2: Print a examination folio
Printing a exam page verifies if the hardware functions correctly.
How to impress a examination page
-
Load plain white newspaper in the newspaper tray.
-
On the printer control panel, press and hold the Cancel button (
) for 3 seconds, and then release. The test folio prints.
-
If these steps resolved the upshot, and the test page prints, there is no need to keep troubleshooting.
-
If the result persists, continue with the next solution.
-
If the test page does not print, continue with the adjacent solution.
Consequence: The Power light is on and the Alert light blinks
The post-obit light pattern displays on the printer control console:
-
Power lite: On
-
Resume lite: Off
-
Wireless light: On or off, depending on the connection status
-
Alarm light: Blinks
-
HP ePrint light: On or off, depending on the connection status
-
Cartridge lights: Off
Figure : Ability light is on and the Warning light blinks

Outcome: The Power light is on and the cartridge lights blink one after the other, from left to right
The following lite design displays on the printer command panel:
-
Power light: On
-
Resume light: Off
-
Wireless low-cal: On or off, depending on the connexion status
-
HP ePrint lite: On or off, depending on the connection status
-
Cartridge lights: Blinks one after the other, from left to right
Figure : The Power calorie-free is on and the cartridge lights blink one subsequently the other, from left to right

Solutions
Follow these steps to turn the printer off and on, and then print a test folio.
 Important: You must install SETUP cartridges during the initial printer setup or the calculator will brandish a cartridge fault.
Unlike replacement cartridges, SETUP cartridges cannot be purchased from retailers. SETUP cartridges are bachelor only in the box with a new HP printer.
Solution one: Turn the printer off so on again
Follow these steps to turn the printer off and so on again.
Stride ane: Plough the printer off and and so on over again
Turning off the printer and so turning it on once again tin recalibrate the cartridges.
-
Press the Power push button to plow off the printer. If the printer does not plough off, continue to the side by side solution.
-
Expect 60 seconds.
-
Printing the Ability button to plow on the printer.
note:
The printer might get through a warm-up menstruum, which might final several minutes. Expect until the warm-up period completes earlier yous continue.
Footstep 2: Print a test page
Printing a exam page verifies if the hardware functions correctly.
How to print a examination folio
-
Load plain white paper in the paper tray.
-
On the printer control panel, press and hold the Cancel button (
) for 3 seconds, and then release. The test page prints.
-
If these steps resolved the upshot, and the test page prints, there is no need to continue troubleshooting.
-
If the consequence persists, continue with the adjacent solution.
-
If the examination folio does not print, continue with the side by side solution.
Result: The Power calorie-free blinks and the cartridge lights blink one after the other, from left to right
The following light pattern displays on the printer control panel:
-
Power light: Blinks
-
Resume light: Off
-
Wireless calorie-free: On or off, depending on the connection condition
-
HP ePrint light: On or off, depending on the connexion status
-
Cartridge lights: Blinks one subsequently the other, from left to right
Figure : The Power light blinks and the cartridge lights blink 1 later the other, from left to right

Solutions
Follow these steps to turn the printer off and on, and and so print a exam page.
Important: You must install SETUP cartridges during the initial printer setup or the computer will display a cartridge mistake.
Unlike replacement cartridges, SETUP cartridges cannot exist purchased from retailers. SETUP cartridges are available but in the box with a new HP printer.
Solution 1: Plough the printer off and and so on over again
Turning the printer off and on again can recalibrate the cartridges.
Step 1: Turn the printer off and then on over again
Follow these steps to turn the printer off and then on again.
-
Press the Power button to turn off the printer. If the printer does not turn off, continue to the next solution.
-
Wait 60 seconds.
-
Press the Power push to turn on the printer.
note:
The printer might get through a warm-upwards period, which might last several minutes. Wait until the warm-up period completes earlier you lot proceed.
Step ii: Print a test page
Press a test page verifies if the hardware functions correctly.
How to print a test page
-
Load plain white paper in the paper tray.
-
On the printer command panel, press and hold the Abolish button (
) for three seconds, then release. The test page prints.
-
If these steps resolved the issue, and the examination page prints, there is no need to go on troubleshooting.
-
If the issue persists, continue with the next solution.
-
If the test page does non print, go along with the next solution.
Solution two: Remove, audit, and make clean the problem cartridge
Ink buildup or debris on the cartridge contacts might cause a cartridge error. Follow these steps to remove, audit, and clean the problem cartridge (the cartridge or cartridges indicated in the error message). First, brand sure that you are using cartridges that are compatible with your printer.
Purchase replacement cartridges and other supplies from the HP Store or local retailers.
-
If the cartridges are uniform, continue with the steps in this solution to remove, inspect, and clean the cartridges.
Pace 1: Remove and inspect the trouble cartridge
Follow these steps to remove and then audit the problem cartridge.
-
Find a clean, lint-free textile (eyeglass wipes or java filters piece of work well) that you lot can use to clean the cartridge contacts.
-
Press the Power push to turn on the printer.
-
Open the cartridge admission door. The carriage moves to the left side of the printer. Wait until the carriage is idle and silent before proceeding.
Figure : Open the cartridge access door
-
Push in on the front end of the problem cartridge to release information technology, and then pull the cartridge toward you to remove it from its slot.
Figure : Remove the problem cartridge from its slot
-
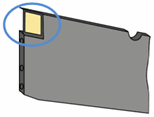
Inspect the copper-colored cartridge contact for ink buildup or debris.
Figure : Copper-colored contact on the cartridge
Pace 2: Clean the cartridge contacts
Follow these steps to make clean the cartridge contacts.
caution:Clean the problem cartridges one at a time. Do not leave a cartridge outside of the printer for more than than 10 minutes. Likewise, never turn off the printer when a cartridge is removed from its slot. Leaving cartridge slots empty might crusade damage to the cartridge ink system.
-
With a clean, lint-free cloth (eyeglass wipes or java filters work well), wipe the copper-colored contact on the cartridge.
Figure : Copper-colored contact on the cartridge
-
Carefully reinsert the cartridge into its slot, and so push the cartridge frontwards until it clicks into place.
Effigy : Reinsert the cartridge
note:
Make sure that the colored dot on the cartridge characterization matches the colored dot on the wagon slot.
-
Repeat these steps for other problem cartridges, if necessary.
-
Close the cartridge access door.
Figure : Shut the cartridge access door
Pace 3: Print a test page
Printing a examination page verifies if the hardware functions correctly.
-
Load plain white paper in the paper tray.
-
On the printer control panel, press and hold the Cancel push button (
) for iii seconds, and and then release. The examination page prints.
-
If these steps resolved the issue, and the exam page prints, there is no need to continue troubleshooting.
-
If the issue persists, continue with the next solution.
-
If the exam page does non print, continue with the side by side solution.
Issue: The Power calorie-free is on and one or more of the cartridge lights glimmer
The post-obit light pattern displays on the printer control panel:
-
Power light: On
-
Resume lite: Off
-
Wireless light: On or off, depending on the connection status
-
HP ePrint light: On or off, depending on the connexion status
-
Cartridge lights: One or more than blinks
Figure : The Ability light is on and ane or more of the cartridge lights blink

Solutions
Important: You must follow these solutions in the order presented to resolve the result.
Solution one: Install cartridges if they take not been installed then print a test folio
Purchase replacement cartridges and other supplies from the HP Store or local retailers.
Important: You must install SETUP cartridges during the initial printer setup or the computer will brandish a cartridge fault.
Unlike replacement cartridges, SETUP cartridges cannot exist purchased from retailers. SETUP cartridges are bachelor only in the box with a new HP printer.
Pace 1: Install the cartridges
Follow these steps to install cartridges if they have non been installed.
caution:Failure to install the SETUP cartridges that came with the printer causes a cartridge error.
-
Printing the Power button to plow on the printer, if information technology is non already on.
-
Open the cartridge access door.
Effigy : Open the cartridge access door
-
Remove the setup cartridge from its packaging.
-
Hold the cartridge so that the cartridge contacts are facing toward the printer.
-
Slide the new cartridge into its slot, and so gently push it forwards until it clicks into place.
note:
Make sure that the colored dot on the cartridge characterization matches the colored dot on the slot.
Figure : Install the cartridge into its color-coded slot
-
Repeat these steps for the other cartridges.
Figure : Install all the cartridges

-
Close the cartridge admission door.
Effigy : Shut the cartridge access door
Step 2: Print a test folio
Printing a examination page verifies if the hardware functions correctly.
How to impress a test page
-
Load plain white paper in the newspaper tray.
-
On the printer control panel, press and concord the Cancel push button (
) for three seconds, and so release. The test page prints.
-
If these steps resolved the issue, and the exam page prints, in that location is no need to keep troubleshooting.
-
If the issue persists, go on with the next solution.
-
If the test folio does not print, keep with the adjacent solution.
Event: The Power light and one or more of the cartridge lights blink
The following light pattern displays on the printer command console:
-
Power light: Blinks
-
Resume light: Off
-
Wireless calorie-free: On or off, depending on the connectedness status
-
HP ePrint light: On or off, depending on the connectedness condition
-
Cartridge lights: One or more blinking
Figure : The Ability light and one or more of the cartridge lights blink

Solutions
Of import: You must follow these solutions in the lodge presented to resolve the issue.
Solution one: Brand sure that the indicated cartridge is installed correctly
Follow these steps to make certain that the cartridge is installed correctly. Remove then reinsert the cartridge a few times if necessary.
Important: You lot must install SETUP cartridges during the initial printer setup or the computer displays a cartridge error.
Unlike replacement cartridges, SETUP cartridges cannot be purchased from retailers. SETUP cartridges are available only in the box with a new HP printer.
Step 1: Remove and so reinsert the cartridge
Follow these steps to remove and reinsert the cartridge.
notation:Perform these steps simply on cartridges that are indicated in the error message.
-
Press the Power button to plow on the printer, if it is not already on.
-
Open the cartridge access door.
Figure : Open the cartridge admission door
-
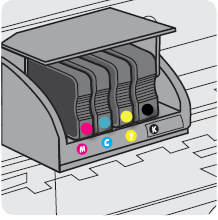
Make sure that the colored dot on the cartridge label matches the colored dot on the carriage slot.
Figure : Properly installed cartridges
-
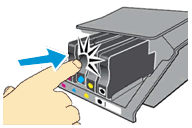
Push in on the front of the problem cartridge to release it, then pull the cartridge toward you to remove it from its slot.
Effigy : Remove the trouble cartridge from its slot
-
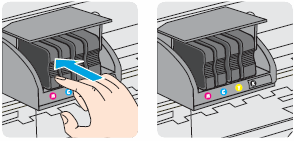
Carefully reinsert the cartridge into its slot, and then push button the cartridge forward until it clicks into place.
Figure : Reinsert the cartridge
-
Repeat these steps for other trouble cartridges, if necessary.
-
Close the cartridge access door.
Effigy : Shut the cartridge access door
Step 2: Print a examination page
Printing a exam page verifies if the hardware functions correctly.
How to print a exam page
-
Load manifestly white newspaper in the paper tray.
-
On the printer command console, press and hold the Cancel push button (
) for 3 seconds, and and then release. The examination folio prints.
-
If these steps resolved the issue, and the examination page prints, there is no need to continue troubleshooting.
-
If the event persists, continue with the side by side solution.
-
If the examination page does not impress, keep with the next solution.
Solution three: Remove, inspect, and clean the problem cartridge
Ink buildup or droppings on the cartridge contacts might crusade a cartridge mistake. Follow these steps to remove, inspect, and clean the problem cartridge (the cartridge or cartridges indicated by the blinking lights). First, make sure that you lot are using cartridges that are compatible with your printer.
Stride ane: Remove and inspect the problem cartridge
Follow these steps to remove then inspect the problem cartridge.
-
Notice a clean, lint-gratuitous textile (eyeglass wipes or java filters work well) that you can apply to clean the cartridge contacts.
-
Press the Power button to plow on the printer.
-
Open the cartridge access door. The carriage moves to the left side of the printer. Wait until the carriage is idle and silent before proceeding.
Figure : Open the cartridge access door
-
Push in on the front of the problem cartridge to release it, and and so pull the cartridge toward you to remove it from its slot.
Figure : Remove the problem cartridge from its slot
-
Inspect the copper-colored cartridge contact for ink buildup or debris.
Figure : Copper-colored contact on the cartridge
Step 2: Clean the cartridge contacts
Follow these steps to clean the cartridge contacts.
caution:Clean the problem cartridges 1 at a time. Exercise non go out a cartridge outside of the printer for more than 10 minutes. Likewise, never turn off the printer when a cartridge is removed from its slot. Leaving cartridge slots empty might crusade impairment to the cartridge ink arrangement.
-
With a clean, lint-free fabric (eyeglass wipes or coffee filters work well), wipe the copper-colored contact on the cartridge.
Figure : Copper-colored contact on the cartridge
-
Carefully reinsert the cartridge into its slot, and then push the cartridge forward until it clicks into place.
Figure : Reinsert the cartridge
note:
Make sure that the colored dot on the cartridge label matches the colored dot on the railroad vehicle slot.
-
Echo these steps for other problem cartridges, if necessary.
-
Close the cartridge access door.
Effigy : Close the cartridge access door
Stride 3: Print a test folio
Printing a test folio verifies that the hardware functions correctly.
How to print a exam page
-
Load manifestly white paper in the paper tray.
-
On the printer control panel, press and concur the Cancel button (
) for 3 seconds, and so release. The test page prints.
-
If these steps resolved the issue, and the test page prints, at that place is no need to continue troubleshooting.
-
If the issue persists, keep with the next solution.
-
If the test folio does not print, continue with the next solution.
-
With the printer turned on, disconnect the power cord from the rear of the printer.
-
Unplug the power cord from the wall outlet.
-
Wait at least xv seconds.
-
Plug the power cord back into the wall outlet.
-
Reconnect the ability string to the printer.
-
Turn the printer on.
Solution six: Replace the cartridges
The light on the control panel indicates the specific cartridge that acquired the error. Identify the problem cartridge, then follow these steps to replace the problem cartridge.
Step 1: Replace the cartridges
If you lot take a defective cartridge or printhead, information technology might be under warranty. To check the warranty on your ink or toner supplies, become to Printer and Folio Yield Overview, and then review the limited warranty information for your supplies.
-
Printing the Power button to plough on the printer, if it is not already on.
-
Open the cartridge access door.
Figure : Open the cartridge access door
-
Push in on the front end of the cartridge to release it, and and so pull information technology toward you to remove information technology from its slot.
Effigy : Remove the cartridge from its slot
-
Remove the new cartridge from its packaging.
-
Hold the cartridge then that the cartridge contacts are facing toward the printer.
-
Slide the new cartridge into its slot, and then gently push it forrad until it clicks into identify.
note:
Make certain that the colored dot on the cartridge characterization matches the colored dot on the slot.
Figure : Insert the cartridge into its color-coded slot
-
Repeat these steps for other cartridges, if necessary.
-
Close the cartridge access door.
Effigy : Close the cartridge access door
Step two: Impress a examination page
Press a test page verifies if the hardware functions correctly.
How to impress a examination page
-
Load plain white paper in the paper tray.
-
On the printer command console, press and concur the Cancel button (
) for 3 seconds, and so release. The test page prints.
-
If these steps resolved the issue, and the test page prints, there is no need to go on troubleshooting.
-
If the result persists, proceed with the next solution.
-
If the test page does not print, continue with the adjacent solution.
Event: The Ability light is on and one or more than of the cartridge lights is on
The following lite blueprint displays on the printer control panel:
-
Ability low-cal: On
-
Resume light: Off
-
Wireless light: On or off, depending on the connection status
-
HP ePrint light: On or off, depending on the connectedness condition
-
Cartridge lights: I or more than are on
Figure : The Power calorie-free is on and ane or more the cartridge lights are on

Solution one: Cheque the ink levels in the cartridges
If the Power light is on and 1 or more of the cartridge lights is on steadily, check to see if the cartridges indicated are low on ink.
note:Ink level warnings and indicators provide estimates for planning purposes simply. When an indicator shows low ink levels, consider having a replacement cartridge available to avoid possible printing delays. If you have installed a refilled or remanufactured cartridge or a cartridge that was used in another printer, the ink-level indicator might be inaccurate or unavailable.
Stride 1: Cheque the ink levels
Employ one of the post-obit methods to check the ink levels in the cartridges.
Method one: Cheque the ink levels from the control console
Print a test page to cheque the ink levels.
-
Load obviously white paper in the newspaper tray.
-
On the printer control panel, press and concur the Cancel button (
) for iii seconds, and then release. The examination page prints.
Method ii: Check the ink levels using HP software
Follow these steps to check the estimated ink levels from the HP software on the estimator.
note:If you are not using the latest version of Windows 8, the information in this document might not match. You can get the latest version from the Microsoft Store.
-
Open up the HP software:
-
Windows eight
On the Start screen, click or tap the printer's tile. The software opens.
annotation:
Yous tin also open the HP software by clicking or tapping the printer'due south icon on the desktop (
 ).
). -
Windows 7
Click Start (
 ), click All Programs, click HP, click the folder for your HP printer, so click the icon for your HP printer (
 ).
). -
Windows Vista
ClickKickoff (
), click Programs, click HP, click the folder for your HP printer, and then click the icon for your HP printer (). -
Windows XP
Click Start (
 ), click All Programs, click HP, click the folder for your HP printer, then click the icon for your HP printer ().
notation:
You can as well open the HP software from your computer desktop; double-click the icon for your HP printer (
).The HP software window opens.
-
-
annotation:
You can also open the HP software from your calculator desktop; double-click the icon for your HP printer.
The HP software window opens.
-
In the HP software window, click Estimated Ink Levels.
The HP Toolbox opens and displays a graphic of the estimated ink levels for each cartridge.
Figure : Estimated ink levels
Step 2: Replace the cartridges with low ink levels
If y'all have a lacking cartridge or printhead, it might exist under warranty. To check the warranty on your ink or toner supplies, go to Printer and Page Yield Overview, and so review the express warranty information for your supplies.
Purchase replacement cartridges and other supplies from the HP Store or local retailers.
-
Printing the Power button to plough on the printer, if it is non already on.
-
Open the cartridge access door.
Figure : Open up the cartridge admission door
-
Push in on the front of the cartridge to release it, then pull it toward yous to remove it from its slot.
Effigy : Remove the cartridge from its slot
-
Remove the new cartridge from its packaging.
-
Hold the cartridge so that the cartridge contacts are facing toward the printer.
-
Slide the new cartridge into its slot, so gently push button it frontward until it clicks into place.
annotation:
Make sure that the colored dot on the cartridge characterization matches the colored dot on the slot.
Effigy : Insert the cartridge into its colour-coded slot
-
Repeat these steps for other cartridges, if necessary.
-
Close the cartridge admission door.
Figure : Close the cartridge access door
Outcome: The Power light is on and the Resume light and one or more of the cartridge lights blinks
The post-obit lite blueprint displays on the printer control panel:
-
Power light: On
-
Resume light: Blink
-
Wireless light: On or off, depending on the connection status
-
Alert light: Off
-
HP ePrint light: On or off, depending on the connection status
-
Cartridge lights: One or more glimmer
Figure : The Ability lite is on and the Resume light and one or more of the cartridge lights blinks

Solution
Follow these steps to make sure that the cartridge access door is closed.
-
Figure : Open up the cartridge access door
-
Figure : Shut the cartridge admission door
Event: All lights are on
The following light blueprint displays on the printer control panel:
-
Ability lite: On
-
Resume light: On
-
Wireless light: On
-
Warning light: On
-
HP ePrint light: On
-
Cartridge lights: All on
Figure : All lights are on

Solution
Follow these steps to resolve the issue.
Step 1: Disconnect and so reconnect the printer power string
Follow these steps to disconnect and then reconnect the power string to the printer.
-
With the printer turned on, disconnect the power cord from the rear of the printer.
-
Unplug the ability cord from the wall outlet.
-
Expect at least xv seconds.
-
Plug the ability cord back into the wall outlet.
-
Reconnect the ability string to the printer.
-
Turn the printer on.
Step 2: Print a test page
Press a test folio verifies if the hardware functions correctly.
How to print a test folio
-
Load plain white newspaper in the paper tray.
-
On the printer control panel, press and hold the Cancel button (
) for iii seconds, and then release. The test page prints.
-
If these steps resolved the issue, and the test page prints, there is no need to continue troubleshooting.
-
If the issue persists, go on with the next solution.
-
If the test page does not impress, go on with the next solution.
Step 3: Service the printer
If y'all have completed all the solutions listed above and are still experiencing a problem, go on to the Service the printer department at the end of this document.
Issue: The Power light is on and the HP ePrint light is off
The following light design displays on the printer control console:
-
Ability light: On
-
Resume calorie-free: Off
-
Wireless light: On or off depending on the status
-
HP ePrint light: Off
-
Cartridge lights: Off
Figure : The Power light is on and the HP ePrint light is off
Solutions
Follow these solutions to resolve the outcome.
Solution one: Turn on HP ePrint
To turn on HP ePrint, press the HP ePrint button ( ).
).
Solution two: Try connecting HP ePrint
Printing the HP ePrint button () to try connecting.
-
If the printer can connect, the HP ePrint light turns on, and and so the printer prints an information page.
-
If the printer even so cannot connect, the HP ePrint light blinks and turns off, so the printer prints an information page.
Issue: The Power lite is on and the HP ePrint light is on
The following lite pattern displays on the printer command panel:
-
Ability light: On
-
Resume lite: Off
-
Wireless light: On or off depending on the status
-
HP ePrint lite: On
-
Cartridge lights: Off
Figure : The Power light is on and the HP ePrint light is on

Solution
HP ePrint is on and set to use.
-
If you printing the HP ePrint button (
) once, the printer prints an information folio that includes the e-mail address you will use for printing documents using HP ePrint. -
To turn off HP ePrint, printing and hold the HP ePrint button (
). The light blinks for v seconds before turning off.
Issue: The Power calorie-free is on and the HP ePrint low-cal blinks
The following light pattern displays on the printer control console:
-
Power light: On
-
Resume light: Off
-
Wireless light: On or off depending on the status
-
HP ePrint low-cal: Blinks
-
Cartridge lights: Off
Effigy : The Ability light is on and the HP ePrint light blinks

Issue: The Power low-cal is on and the Wireless low-cal blinks
The post-obit light pattern displays on the printer control panel:
-
Power light: On
-
Resume low-cal: Off
-
Wireless calorie-free: On
-
HP ePrint light: On
-
Cartridge lights: On, off, or blinking, depending on status
Effigy : The Power light is on and the Wireless light blinks

Service the printer
Service or supplant your HP product if the issue persists subsequently completing all the preceding steps.
Go to Contact HP Customer Support to schedule a product repair or replacement. If yous are in Asia Pacific, you will be directed to a local service center in your area.
To confirm your warranty status, go to HP Product Warranty Cheque. Repair fees might apply for out-of-warranty products.

How To Clean The Rollers On Epson Wf 7110,
Source: https://support.hp.com/ca-en/document/c03588307
Posted by: curtisaften1971.blogspot.com
0 Response to "How To Clean The Rollers On Epson Wf 7110"
Post a Comment